WhatsApp Adds Chat Lock Codes for Extra Privacy

whatsapp-chat-lock-codes-extra-privacy

WhatsApp has added another chat security element, with a new lock code option that users can enact to keep others out of their chats in the app.

As you can see in this example, you can now apply a unique code to any of your chats, so that nobody else can access them on your device.

“With a secret code you’ll now be able to set a unique password different from what you use to unlock your phone to give your locked chats an extra layer of privacy. You’ll have the option to hide the Locked Chats folder from your chatlist so that they can only be discovered by typing your secret code in the search bar.”

The new option is an expansion of WhatsApp’s Chat Lock, which it rolled out back in May. Chat Lock is primarily designed to help those who share their phone with others, like family members, which is not common practice everywhere, but is fairly usual in some regions. In developing markets like India, for example, lower-middle class families often only have one device that’s shared by the family, with parents and siblings splitting time.


In situations like this, having the capacity to lock down certain chats could be a big benefit, and could provide more privacy for WhatsApp users.

And now, you’ll be able to add another level of privacy, with manual codes to keep people out of your chats.

Though remembering more codes is less than ideal, but if you really want to keep your chats private…

WhatsApp also notes that you can now long press on a chat to lock it, rather than visiting the chat’s settings.

The option adds another level of data privacy and security, which is what WhatsApp hangs its hat on, and as such, it makes sense to give users more options on this front.

Read More Comments

Google Messages will soon suppress background noise in your voice notes


There are several instant messaging services to choose from these days. Despite its exhaustive list of products and services, Google still seems intent on keeping Messages competitive with other messaging options on the market. Voice messaging is one of the perks of Messages, but background noise can reduce the value of this feature. Now, Google is rolling out changes to ensure that these inconveniences don’t deter users.


As spotted by AssembleDebug on their TheSpAndroid blog, the beta version of Google Messages now seems to feature a "Noise Cancellation" button. When you tap on it, you can reduce background noise in your surroundings that may interfere with the recording of a voice note. The option can be toggled on at any time, including while you’re in the middle of a recording. The feature seems to only be in the beta version of Messages for now and require activating flags, but might get a wider rollout soon. It's part of the redesigned voice recorder we spotted earlier in any event.


This isn’t the only change to Google’s instant messenger that has been noted — TheSpAndroid also picked up on markdown text formatting in beta. In short, markdowns allow you to format text by using symbols, such as asterisks. For now, it seems that only a handful of markdowns are working within the messenger. However, it’s supposedly not just another experiment — Google is expected to roll it out formally to all users in the near future.

The company has seemingly paid special attention to Messages as of late, developing several new features, some of which may not become official. For example, color and wallpaper options appeared in Messages in November 2023, which gave the app a more customized feel. Google also began trying out profile options for Messages, which would give users the ability to create a shareable profile with personal details. Through a discoverability option, people could also make themselves easier to find on the platform. These features were spotted in flags, however, and the company has not confirmed if they will eventually launch in the stable version of Messages.

If wallpaper and custom colors were to be integrated, Messages would undoubtedly receive a UI upgrade. These features might seem minor, but they can go a long way toward helping Google ensure that its instant messenger is keeping pace with competitors. Signal, for instance, has already had the option to add custom wallpaper to chats. Alternatives like Meta’s WhatsApp also give users a slew of stickers and other media that can be embedded for a more entertaining experience. Google isn’t lagging behind just yet in terms of its Messages features, but there’s no reason for it to wait until users begin fleeing to other options.


Read More Comments

YouTube Will Now Let You Add More Links To Your Channel Profile

 YouTube’s rolling out its expanded link listing display for channels, which will enable creators to add more external links to their channel header.


As you can see in this example, you can now add up to 14 links to your channel profile, which will help to drive traffic to your website, other social media profiles, product pages, etc.

Channel owners are able to customize the titles of their links, while each link will also be shown with the relevant platform icon in the pop-up display. That’ll provide more ways to build your web presence from your YouTube, and could be a valuable option for extending your connections off-platform.

YouTube first previewed the update back in May, as part of a broader refresh of some key channel elements.

Along the same line, YouTube’s also adding some additional channel tabs, like “Courses” for those that have courses enabled, and a “Releases” tab for musicians to showcase their latest tracks and albums.

The idea is that by providing more external linking options, YouTube will be a more attractive home base for creators, which will better ingratiate the platform with its top stars, by working as a growth assistant, as opposed to siloing off each aspect.

It’s a good update, which could drive big value for some users.

YouTube says that the new link display will be visible to all users by August 23rd.


Read More Comments

How To Watch Amazon Prime Video Offline On Your Mac: A Comprehensive Guide

amazon prime logo

Are you tired of being tethered to an internet connection just to watch your favorite shows on Amazon Prime Video? Don't worry, you're not alone. Luckily, there's a way to watch Amazon Prime Video offline on your Mac, and in this article, we'll show you how to do it step-by-step.

Introduction

Amazon Prime Video is one of the most popular streaming services available today, offering users a vast selection of movies and TV shows. However, one of the biggest drawbacks of the service is that it requires a stable internet connection to stream content. This can be a problem if you want to watch your favorite shows while traveling or in areas with poor connectivity. But, don't worry, as we have got you covered. In this article, we'll guide you on how to watch Amazon Prime Video offline on your Mac, so you can enjoy your favorite shows without any internet connection.


How To Watch Amazon Prime Video Offline On Your Mac

Let's dive into the step-by-step process to watch Amazon Prime Video offline on your Mac:


Step 1: Download and Install Amazon Prime Video

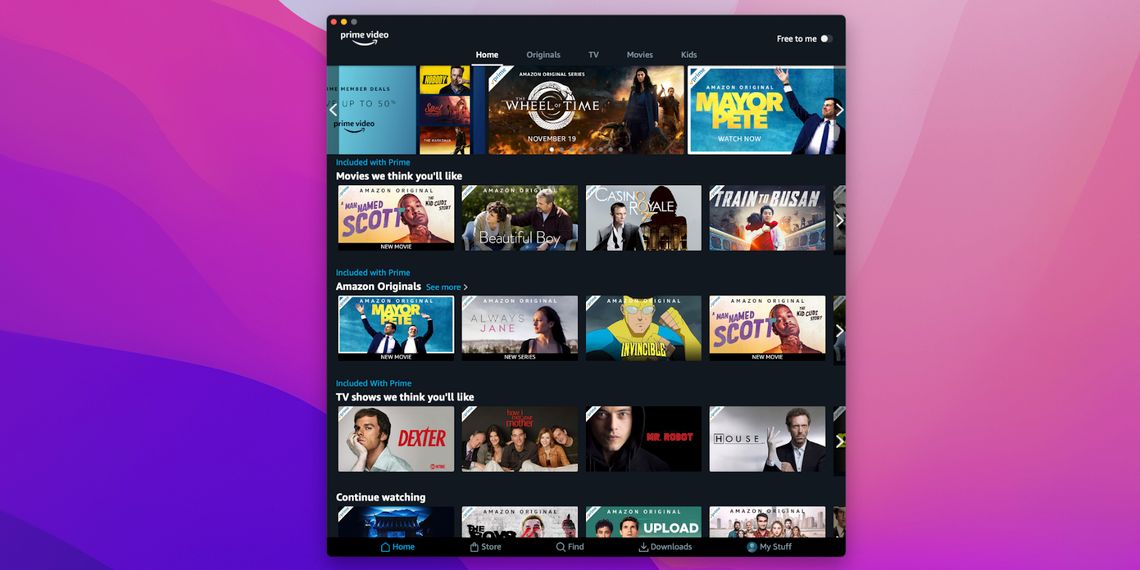
The first step is to download and install the Amazon Prime Video app on your Mac. You can download it from the Mac App Store or directly from the Amazon website.


Step 2: Log in to Your Amazon Prime Account

After downloading and installing the app, open it and log in to your Amazon Prime account using your login credentials.


Step 3: Choose the Content You Want to Download

Now, select the movie or TV show that you want to download. Once you've chosen your desired content, click on the "Download" button.


Step 4: Check the Download Status

After clicking on the download button, you can check the status of your download by clicking on the "Downloads" tab. Here you can see the progress of your downloads.


Step 5: Watch Amazon Prime Video Offline on Your Mac

Once your download is complete, you can watch your downloaded content offline on your Mac by opening the Amazon Prime Video app and clicking on the "Downloads" tab. Here, you can find all your downloaded content, and you can watch it without an internet connection.


Why Should You Watch Amazon Prime Video Offline on Your Mac?

Watching Amazon Prime Video offline on your Mac has several benefits. Firstly, it allows you to watch your favorite shows and movies even when you don't have access to the internet. This is particularly useful when you're traveling or in areas with poor connectivity. Secondly, downloading content can also save you data and money, especially if you're using a limited data plan.


FAQs

Here are some frequently asked questions about how to watch Amazon Prime Video offline on your Mac:

1. Can I download any movie or TV show on Amazon Prime Video?

No, not all movies and TV shows are available for download on Amazon Prime Video. However, most of the popular content is available for download.


2. How many times can I download a movie or TV show on Amazon Prime Video?

You can download a movie or TV show on Amazon Prime Video as many times as you want. However, you should note that the downloaded content is only available for a limited period, after which it will expire.


3. How long does it take to download a movie or TV show on Amazon Prime Video?

The download time depends on various factors, such as the speed of your internet connection and the size of the file. However, on average, a one-hour TV show takes

4. Can I watch my downloaded content on another device?

Yes, you can watch your downloaded content on another device as long as you're logged in to your Amazon Prime account and the device is compatible with the Amazon Prime Video app.


5. Can I download content in HD on Amazon Prime Video?

Yes, you can download content in high definition (HD) on Amazon Prime Video. However, you should note that downloading HD content will take up more storage space on your device.


6. How do I delete downloaded content on Amazon Prime Video?

To delete downloaded content on Amazon Prime Video, go to the "Downloads" tab and click on the "Edit" button. From there, you can select the content that you want to delete and click on the "Delete" button.


Conclusion

Watching Amazon Prime Video offline on your Mac is a convenient way to enjoy your favorite shows and movies without an internet connection. By following the steps outlined in this article, you can easily download and watch your favorite content offline on your Mac. So, what are you waiting for? Start downloading your favorite movies and TV shows today and enjoy uninterrupted viewing.


Read More Comments

Facebook Pro APK: The Ultimate Social Media Experience

Facebook Pro APK icon


Are you tired of using the same old Facebook app? Are you looking for something faster, more convenient, and customizable? Look no further than Facebook Pro APK!

This amazing app provides you with the ultimate social media experience by offering faster browsing speeds, smoother navigation, and enhanced features. In this blog post, we'll explore everything you need to know about Facebook Pro APK.


What is Facebook Pro APK?

Facebook Pro APK is an enhanced version of the original Facebook app that offers a range of benefits and features not available in the standard app. With Facebook Pro APK, you can enjoy faster browsing speeds, improved performance, and a more personalized user interface.


Benefits of Facebook Pro APK


Here are some of the top benefits of using Facebook Pro APK:

  1. Faster Browsing Speeds: Facebook Pro APK is optimized for faster browsing speeds, so you can access your newsfeed, messages, and other features more quickly.
  2. Improved Performance: Facebook Pro APK is designed to run smoothly on all devices, so you won't experience any lag or crashes while using the app.
  3. More Customizable: With Facebook Pro APK, you can customize your app to suit your preferences, including changing the theme, font size, and layout.
  4. Ad-Free Experience: Facebook Pro APK is free from ads, so you can enjoy uninterrupted browsing without any distractions.
  5. Increased Privacy: Facebook Pro APK offers enhanced privacy features, including the ability to block ads, disable tracking, and hide your online status.

How to Download Facebook Pro APK

  1. Downloading Facebook Pro APK is easy! Here's how to do it:
  2. Go to the official Facebook Pro APK website.
  3. Click on the "Download" button.
  4. Wait for the download to complete.
  5. Install the app on your device.
  6. Open Facebook Pro APK and start enjoying the ultimate social media experience!


FAQs

     1.Is Facebook Pro APK safe to use?
         Yes, Facebook Pro APK is safe to use. However, make sure you download the app from the                     official website to avoid any security issues.
     2.Can I use Facebook Pro APK on my iPhone?
        No, Facebook Pro APK is only available for Android devices.
     3.Is Facebook Pro APK free?
        Yes, Facebook Pro APK is completely free to download and use.


Conclusion

Facebook Pro APK is the ultimate social media experience that provides you with faster browsing speeds, improved performance, and more customizable features. By downloading this app, you can enjoy an ad-free, more private, and personalized Facebook experience. So, what are you waiting for? Download Facebook Pro APK now and take your social media game to the next level!


Read More Comments

Insta Pro Apk Download: Everything You Need to Know


Are you looking to download Insta Pro Apk, but not sure where to begin? Well, you're in the right place. In this comprehensive guide, we'll cover everything you need to know about Insta Pro Apk, from its features to the download process and much more.

Introduction

Instagram has become a popular social media platform, and people are always searching for ways to enhance their experience on it. Insta Pro Apk is a modified version of Instagram that offers more features than the original app. In this article, we will explain what Insta Pro Apk is and how to download it.


What is Insta Pro Apk?

Insta Pro Apk is a third-party app that offers more features than the original Instagram app. It is not available on the Google Play Store, but you can download it from third-party websites. The app is free to download and use.


Features of Insta Pro Apk

Insta Pro Apk offers a variety of features that are not available on the original Instagram app. Here are some of the features that Insta Pro Apk offers:


No Ads

One of the biggest advantages of using Insta Pro Apk is that there are no ads. The original Instagram app is filled with ads that can be annoying. With Insta Pro Apk, you can enjoy a seamless experience without any ads.


Downloading Images and Videos

Another great feature of Insta Pro Apk is that you can download images and videos from Instagram. The original app doesn't allow users to download media, but Insta Pro Apk does.


Viewing Profile Picture

On the original Instagram app, you cannot view someone's profile picture in full size. However, with Insta Pro Apk, you can view someone's profile picture in full size.


Multiple Languages

The original Instagram app is only available in a few languages. With Insta Pro Apk, you can use the app in a variety of languages.


Dual Instagram Accounts

If you have two Instagram accounts, you have to switch between them on the original app. However, with Insta Pro Apk, you can use two Instagram accounts at the same time.


How to Download Insta Pro Apk

Now that you know what Insta Pro Apk is and its features, let's talk about how to download it. Follow these steps:

  1. Go to your phone's settings and enable "unknown sources."
  2. Download the Insta Pro Apk file from a third-party website.
  3. Locate the downloaded file and tap on it to install the app.
  4. Once the installation is complete, open the app and log in to your Instagram account.

FAQs

1. Is Insta Pro Apk safe to download?
Insta Pro Apk is safe to download and use. However, you should only download the app from a trusted website to avoid any security issues.

2. Can I use Insta Pro Apk on iOS devices?
No, Insta Pro Apk is only available for Android devices. You cannot use it on iOS devices.

3. Will I get banned from Instagram for using Insta Pro Apk?
Using Insta Pro Apk is against Instagram's terms of service, and there is a risk of getting banned. However, many users have reported using the app for a long time without any issues.

4. Can I use Insta Pro Apk on a PC?
No, Insta Pro Apk is only available for Android devices. You cannot use it on a PC.

5. How do I update Insta Pro Apk?
You can update Insta Pro Apk by downloading the latest version from the same website where you downloaded the original app.

6. How do I uninstall Insta Pro Apk?
To uninstall Insta Pro Apk, go to your phone's settings, select "Apps," find Insta Pro Apk, and click "Uninstall."

Conclusion
Insta Pro Apk is a great alternative to the original Instagram app. It offers more features that can enhance your experience on the platform. However, it's important to download the app from a trusted website and be aware of the risks involved in using a third-party app. We hope this guide has helped you understand what Insta Pro Apk is and how to download it.

Don't hesitate to try Insta Pro Apk, but be careful while downloading it. Thank you for reading this guide!
Read More Comments

How To Watch Amazon Prime Video Offline On Your Mac

How To Watch Amazon Prime Video Offline On Your Mac

There's a heap of great content to watch on Amazon Prime Video, and thanks to the official Prime Video app, saving videos offline on a Mac can be done in mere seconds. Keeping up with every streaming app is no easy task these days. Just a few short years ago, deciding on a streaming app used to be a simple battle between Netflix and Hulu. Today, those services are now joined by the likes of HBO Max, Disney+, Peacock, Paramount+, Shudder, and others. It's a lot.

As with any streaming app, an important component of Amazon Prime Video is being able to download your shows and movies for offline viewing. On any Mac or MacBook device, open the App Store, search for 'Amazon Prime Video,' and click the blue 'Install' button. Upon opening the app for the first time, users are asked to sign in with their Amazon login credentials. From there, downloading videos is dead simple. Click on a movie or TV show, click the 'Download' icon, and click 'Continue with download' on the pop-up that appears. Just like that, the video is downloading locally onto your Mac for offline viewing.

Tips For Prime Video Offline Downloads On Mac


It's worth choosing your preferred download quality before downloading a bunch of videos. To do this, click the 'My Stuff' button on the bottom navigation bar, then click the settings gear icon in the top-right corner, followed by 'Streaming & Downloading,' and 'Download quality.' Here, Amazon Prime Video has three tiers of download quality to choose from. Best (the default choice) uses about 2.9GB of data/storage per one hour of video. Better uses 1.4GB of data/storage for the same hour, while Good uses just 0.8GB of data/storage per hour.

Which one you should choose depends on a few factors. If you're someone who has to have the best-looking video when you're watching something, the 'Best' download quality will ensure downloaded videos are as crispy as possible. If you're downloading a few different titles but your Mac is low on storage, you'll want to select 'Good.' Want decent video quality but don't want to blow through your remaining storage? The 'Better' tier strikes a happy medium between Best and Good.

Prime users can also choose to have certain types of content downloaded automatically. From the same 'Streaming & Downloading' page, click the 'Auto Downloads' button to adjust automatic download preferences. When downloading a TV show, Auto Downloads automatically downloads a handful of episodes at once. By default, the feature is turned on and set to download three episodes at a time.

Users can change this, and choose to automatically download anywhere from one to five episodes at a time, have watched episodes automatically delete themselves, or disable Auto Downloads entirely if they'd rather not use the feature. If you're just picking random episodes to download, it probably makes sense to turn Auto Downloads off. However, if you're watching a series in order and want to catch up on a few episodes, it can be legitimately useful.


How To Find Your Downloads


Clicking the 'Downloads' button at the bottom of the app will immediately show all downloaded shows and movies on your Mac. To delete a downloaded video, click the 'Edit' button in the top-right corner, click the checkbox next to a video, and click the red 'Delete' button at the bottom of the screen. Similarly, if someone starts a download but wants to cancel it, click the three dots next to the downloading video and click 'Cancel download.' With those tips in mind, you're ready to start downloading Prime Video shows on your Mac like a pro.

There are a few things to keep in mind when downloading Amazon Prime Video content. For one, not every show or movie will be available for download. For those that are, there are some limits. Downloads for content obtained through a subscription — as opposed to rented or purchased — can only be downloaded to two devices at once. So, if a user has already downloaded a show onto two other devices, they’ll need to delete it from one before downloading it to their Mac. There are also limits to how many titles a person can download at a time, though these limits vary by location. For the most part, users shouldn’t run into any issues if they’re not going overboard with downloading.

In addition to downloading Prime Video titles on Mac, the streaming service also supports offline downloading on other devices. This includes iOS, Android, Windows, and Amazon's Fire tablets. The steps vary slightly for these other platforms, but macOS isn't the only place where you can download Amazon Prime Video shows for offline viewing.


Source: Amazon 1, 2

Read More Comments

How To Transfer Signal Conversations To A New Phone

How To Transfer Signal Conversations To A New Phone

Signal brings a lot of great messaging app features to the table, one of which is a transfer tool (available for Android and iOS) that makes moving conversations from an old phone to a new one as simple as can be. Unlike apps such as WhatsApp, Telegram, and Facebook Messenger, Signal can only be used on one phone at a time, and all conversations are stored locally on the device. In other words, if someone logs into their Signal account on a new phone, they won’t immediately see any of their previous conversations. Thankfully, though, Signal's migration tool does make it possible to move them across.

For people who use an iPhone and just upgraded to a new model, Signal reassures users that the process of transferring chats is pretty straightforward. To get started, make sure both the new and old iPhones are close to each other, have Wi-Fi and Bluetooth enabled, and Low Power mode disabled. On the new iPhone, install the Signal app from the App Store and complete the login/registration process. Once that’s done, tap 'Transfer from iOS Device’ and then ‘Next.’ Now, open Signal on the old iPhone, and there should be a pop-up on the screen. Tap ‘Next’, a small camera will open, and then use the old iPhone to scan the QR code on the new iPhone. This begins the transfer process, which should only take a few minutes.

Related :
How To Tell If Someone Unfriended You On Snapchat


Transfer Signal Messages Between Android Phones


Signal's transfer tool is also available for Android users. The steps are a bit different, though the end result is the same. On the new Android phone, install Signal, open the app, and tap 'Transfer or restore account.' Enable any permissions that are requested, tap 'Transfer from Android device,' and tap 'Continue.' Now go to the old Android phone, tap the profile icon, tap 'Account,' tap 'Transfer account,' and tap 'Continue.' From here, there are just a few final steps. Move the two phones next to each other, accept the alert on the new Android phone, make sure the seven-digit code on both devices is the same, and tap 'Continue' on each one.

Android users also have the option of transferring Signal messages with a backup file. First, you'll want to make sure a backup file is made. On your old phone, tap the profile icon, tap 'Chats,' tap 'Chat backups,' and tap 'Turn on.' Follow the on-screen instructions, and within a few seconds, you'll get a backup folder containing all of your message data. Once the backup file's created, move it to the new Android phone, open Signal, tap 'Transfer or restore account,' tap 'Restore from backup,' and enter your 30-digit passcode.

No matter if chats are being transferred across Androids or iPhones, all conversations remain end-to-end encrypted just like they were on the old device, ensuring everything remains just as secure as ever. Having to manually transfer conversations in the first place is a slight annoyance compared to some of Signal's competition, but considering nothing is lost from a data privacy perspective, it's a pretty great solution all-around.

Can You Transfer Signal Messages From Android To iPhone?


For iOS users, Signal supports chat transfers between two iPhones, from an unlinked iPad to an iPhone, from an iPhone to an unlinked iPad, and from an iPad to an iPad. Android users can only move chats from one Android phone to another. Signal desktop users are also at a disadvantage, as there's no way to transfer chats to a new device. At the moment, Signal does not offer cross-platform chat transfers, unlike apps like WhatsApp, which means users switching operating systems don't have any way to migrate their chats to a new device.

Like WhatsApp, Signal also offers users the ability to link devices to their phone. Users can link either a desktop or iPad to their smartphone. At the moment, Signal does not offer the ability to link Android tablets or multiple phones. For those using linked devices, Signal unfortunately doesn't offer the ability to transfer chats from a linked desktop or iPad to a new phone. This is because linked devices do not have the same Signal account information as a smartphone.

Related :
This Is Why The iPad 10th-Generation Doesn’t Work With Apple Pencil 2


How To Change Your Phone Number On Signal


Signal lets users change their phone number, provided that they have an active Signal account, and are changing their number while using the same phone. If a user is unable to send or receive Signal messages (check this by using Note To Self), does not have access to their phone, or has reset their phone, they will not be able to migrate to a new phone number.

Provided the user is accessing Signal on the same device, the first step is to open Signal Settings. Next, tap 'Account' and then 'Change Phone Number.' Once this option is selected, users will not be able to go back and undo the change. Tap 'Continue' and enter the old phone number in the first field and new phone number in the second field. Tap 'Continue' or 'Done.' Confirm the new number, or alternatively, tap 'Edit Number' if the new number entered was incorrect. Tap on 'Change Number' and follow the instructions to complete the registration.

If a user doesn't have access to their old phone number, they will first need to delete their Signal account and then register with their new number. They will lose all access to their message history if this happens. As a safety feature, if someone registers for Signal with the old phone number, they won't be able to access the user's message history. In addition, Signal will notify a user's contacts of a safety number change if they continue exchanging messages with the old phone number.

Source: Signal 12

Read More Comments

How To Tell If Someone Unfriended You On Snapchat

How To Tell If Someone Unfriended You On Snapchat

Snapchat doesn't make it immediately apparent, but there are multiple indicators that tell users if they have been unfriended. Snapchat makes it easy to add new friends, either using Quick Add or from the friends screen. Removing a friend is equally easy, and involves long-pressing on their name in the Chat screen, tapping 'Manage Friendship,' and then 'Remove Friend.' Snapchat doesn't notify users if they've been removed as a friend, but there are a few ways to find out.

The easiest way to check if someone has unfriended you on Snapchat is by checking the Friends list. To do this, open Snapchat and tap the profile icon on the camera screen. Scroll down and tap 'My Friends' to see a list of all current friends. Scroll or search for their username. If their name doesn't appear in the list, they've unfriended you.

Find Out Who Unadded You On Snapchat


It also is an indicator that a user unfriended you if your messages to them say 'Pending.' However, this doesn't apply to users who have enabled the option for anyone to message them, and not just friends. Another trick to find out if someone is still a Snapchat friend is to click on their profile picture or Bitmoji. If they're still a friend, their Snap Score and other contact information will be displayed. If not, this information won't be visible.

Checking a user's stories can also reveal if they're a friend. If a user’s stories appear under 'Subscriptions' instead of 'Friends,' they are no longer a friend on Snapchat. It's worth noting that if someone has set their stories to 'My Friends,' their stories will no longer be visible. So if a user previously posted stories regularly and appears to have abruptly stopped posting, it's possible that they've unfriended you.

Can You Message Someone If They Unfriended You On Snapchat?


If someone has unfriended you on Snapchat, it's still possible to send them a message, provided their 'Contact Me' privacy settings aren't set to 'Friends.' If this option is enabled, the person will only be able to receive chats from their Snapchat friends. Provided the other person allows anyone to message them on Snapchat, users can just send them a message from the chat screen if an existing chat with them is already open.

If there's no existing chat, search for the person from Search, Add Friends, or Recommended Contacts in your feed. Tap on their profile picture to open a chat and message them. Do note that Snapchat users have the option to hide or block messages that don't come from friends. Additionally, Snapchat users need to be 18 years old or above to receive messages from people who aren't their friends.


Source: Snapchat

Read More Comments

How to Fix Move to iOS WhatsApp Not Showing in 2023?

How to Fix Move to iOS WhatsApp Not Showing in 2023?

The most important and well-liked instant messaging app, WhatsApp is accessible on both iOS and Android devices. So you decided to utilize Move to iOS to allow data transfer so that you could transfer your files from your old Android phone to a new iPhone device. To make the transition simpler, Apple released the “Move to iOS” app. However, it is unstable, and several customers say that the switch to iOS WhatsApp is inoperable because they experience numerous runtime issues. This article covers that topic and explains how to move your chat over even if the functionality isn’t functioning properly for you.

Why is My “Move to iOS” WhatsApp Not Working?

There are a number of reasons why Move to iOS can prevent WhatsApp from appearing as a file transfer option. These may be a few of the causes:

  • Update WhatsApp to the most recent version.
  • Your two devices should be connected to the same network.
  • Consider using an electrical outlet to power both devices.
  • iOS 15.5 or later must be installed on your iPhone.
  • Surely there is a WhatsApp compatibility problem.
  • Before transferring, make sure your device has been reset to factory settings.

Is There an Alternative to “Move to iOS” in 2023?

When using it to transfer data from Android to iPhone, there may be errors (move to iOS transfer halted, etc.). That also suggests that not everyone will find it acceptable. Okay, this practical tutorial will walk you through your alternative for moving to iOS. Exists a substitute for Move to iOS? Yes, there are Move to iOS Alternatives. You might wish to pick an alternative if you tried the Move to iOS app and had a poor experience. The top Move to iOS alternatives is listed below. Whatsapp may be transferred to iPhones without restriction using Tenorshare iCareFone Transfer. It guarantees that you may preview and choose the needed files with a single click.


How to Fix Move to iOS WhatsApp Not Showing Using iCareFone Transfer?

Similar to Move to iOS, iCareFone Transfer is designed to transfer WhatsApp data between iOS and Android, Android & Android, iOS & iOS. iCareFone Transfer is an excellent choice for you if all you want to do is transfer your WhatsApp data, such as messages, photographs, and files, from your Android device to your iPhone. Without any restrictions, iCareFone Transfer allows transferring messages and attachments from WhatsApp and WhatsApp Business between Android and iOS, Android and Android, and iOS and iOS. Your WhatsApp chats may be transferred in a matter of seconds, and it is easy to use. Because the software will lead you, you don’t need to be an expert in many different technologies.

On both Windows and Mac computers, this application runs without a hitch. As a result, using the programme for WhatsApp transfer won’t cause you any problems.


Useful Features of iCareFone Transfer 

The following are only a few of the software’s unique features:

  • Support data sharing across Android devices as well.
  • Backup and restore options are available for WeChat, Kik, Line, Viber, and WhatsApp.
  • Export WhatsApp and WhatsApp Business backups to HTML.
  • Support Google Drive data downloads and restores for WhatsApp.
  • Allow for the transmission of a variety of data kinds, including text, video, photos, audio, documents, and emoticons.
  • Work with WhatsApp Business as well.
  • No individual data is gathered.

The steps of transfer chats from Android to iPhone with iCareFone Transfer

Step 1: Download and instal iCareFone Transfer (iCareFone for WhatsApp Transfer) on your PC, then connect both devices (your old Android and new iPhone) to it.


Step 2: Select “Transfer” from the menu. There will be a confirmation popup. On it, click “yes”.


Step 3: Go to Settings > Chat > Chat backup > Back Up and create a fresh backup if your WhatsApp is not already backed up. The software will then begin transferring data from the Android handset to the iPhone and deliver the essential details.


Step 4: Restoring the Android WhatsApp data to the iPhone requires opening the WhatsApp app on your iPhone and log in with the account you used. Watch for a complete data restoration.


Tips to Restore WhatsApp Backup from Google Drive to iPhone?

Absolutely not! Direct restore whatsapp backup from google drive to iphone is not possible. A great tool for data management and sharing is Google Drive. Any Android device may access the backup that is housed on Google Drive, however iPhones are not supported. Google Drive’s encryption standards are incompatible with iOS. Therefore, restoring WhatsApp from Google Drive to an iPhone is not possible.

The good news is that there are still a way to move, backup, and recover WhatsApp between Android and iPhone without using Google Drive which is by using Tenorshare icarefone Transfer.


Hot FAQs

  • Does Move to iOS work for WhatsApp?

You can transfer your account information with move to ios if you’re switching from an Android phone to an iPhone, however many users claim that it sometimes move to ios whatsapp not showing and causes errors.


  • Can I use Move to iOS after setup?

Yes, but only during phone setup does the Move to iOS app function. Additionally, it can occasionally stop operating, therefore you must utilise a trustworthy method, such as Tenorshare’s Icarefone transfer. For you, iCareFone for WhatsApp Transfer is a wonderful choice.


  • What is the fastest way to transfer from Android to iPhone?

Using Tenorshare’s icarefone transfer is the quickest way to move data from an Android device to an iPhone. Apple Mac’s new iCareFone Transfer for WhatsApp Backup outperforms the standard method for backing up WhatsApp chats to computers and Macs with incredible speed. just one click.


Final Verdict 

Without the greatest transfer tools, transferring your important data from an old Android smartphone to a new iPhone might take a lot of time. Even if Move to iOS, Apple’s patented solution to the issue, isn’t always reliable. The transfer to iOS app may only be used under certain circumstances. The programme should function flawlessly if those requirements are satisfied. But occasionally it is unable to do so. Therefore, you must be prepared with efficient solutions to address the problems and proceed with the transfer. However, Tenorshare iCareFone is preferred than Move to iOS. Due to the fact that it is a better and more effective method for data transport.

Read More Comments

How To Set Up Instagram’s ‘Quiet Mode’ To Minimize Distractions

How To Set Up Instagram’s ‘Quiet Mode’ To Minimize Distractions


Instagram has released a new feature called Quiet Mode that allows users to take some time off the app by not showing them any updates. Along with Quiet Mode, Instagram has also released other features that enable users to manage the content they see on the Explore page, Search, and Reels. These features will help users take control of the type of content they consume on the app and the time for which they use the app.

In its official blog post, Instagram writes that Quiet Mode will help users focus by not sending notifications for a specific time. Users can customize their Quiet Mode hours as per their schedule. Once the Quiet Mode hours end, users will receive a quick notification summary from Instagram. Although all users can enable Quiet Mode, the Meta-owned social media platform says it will encourage teens to enable the feature if they "spend a specific amount of time on Instagram late at night."

Quiet Mode Will Help Users Save Some Time


To enable Quiet Mode, open Instagram, tap on the hamburger button in the top right corner of the screen, and select 'Settings.' On the next page, tap on 'Notifications.' Now, select 'Quiet Mode' with a description that reads, "automatically pause notifications every day and change your status." Now enable the feature by pressing the toggle toward the right side of the screen. Users can also schedule the Quiet Mode by selecting a suitable time beside 'From' and 'To.' However, Instagram limits the duration of Quiet Mode to 12 hours.

Upon enabling the Quiet Mode, Instagram will change users' profile activity status to "in quiet mode," indicating that the user is not active on the app. The platform will also show a crescent moon icon at the bottom of the user's profile picture in the Stories section. Further, if someone messages the user in Quiet Mode, Instagram will send an auto-reply that says, "[username] wasn't notified about this message because they're in quiet mode."

As an alternative to Quiet Mode, users might consider enabling Focus Mode, available on both Android and iOS devices. In addition to blocking notifications from Instagram, Focus Mode stops notifications from all apps for a set time. Users can also enable and disable the Focus Mode on a schedule. Although young Instagram users can benefit from the feature, it is only available in Australia, Canada, Ireland, New Zealand, the United States, and the United Kingdom. Nevertheless, Instagram hopes to bring Quiet Mode to other countries soon.

Read More Comments

Spotify Downloads: Can You Listen To Songs Offline For Free?

Spotify Downloads: Can You Listen To Songs Offline For Free?

Spotify is an excellent platform for avid music and podcast listeners because it offers the ability to download files and listen offline, but can anyone do it for free? Like most apps that offer a tier of basic and premium features, the free version of Spotify comes with certain service restrictions, such as a limited amount of track skips or ads that sporadically pop up mid-audio track. Those who upgrade to Spotify Premium have the benefit of removing such restraints to their listening experience.

The question remains, though: Is being able to download Spotify content and listen offline a basic feature available to all users? The answer is both a yes and a no, depending on what users tend to listen to on Spotify. People who’ve decided to stick to a free version of the service can only download podcast episodes and listen to them without internet connectivity, not music. Spotify Premium subscribers have the added ability to download songs, albums, and playlists as well. Do note, however, that according to Spotify, a Premium membership may be required to download certain podcasts and shows.

How To Download Songs, Albums, Playlists, and Podcasts on Spotify (& Delete Them After)


​​​​​​​All Spotify users are limited to 10,000 downloaded tracks for each type on up to 5 different devices and are required to go online at least once every month to keep the files. The process for saving Spotify content for future offline listening is the same, whether a person is accessing the app for free or on a paid subscription.

Simply launch Spotify on either a desktop computer or a mobile device and head to the item to download — note that individual songs cannot be downloaded, but they can be placed in a playlist, which can be downloaded. Then, hit the downward arrow icon next to the file to download it to the library. When the arrow icon turns green, that means the item has been downloaded successfully and can be listened to without internet. Files that either have a non-green arrow or arrow circle icon next to it have not yet been downloaded.

By default, Spotify uses Wi-Fi to download files for offline listening. However, mobile users can decide to download audio tracks using cellular data by tapping the gear icon in the app’s main screen, going to ‘Audio Quality,’ and switching the ‘Download Using Cellular’ toggle to the on position. Don’t forget though that downloading Spotify files can consume a significant amount of mobile data.

When Spotify listeners play a downloaded item, it will continue playing even when the internet connection cuts out. However, to ensure that only downloaded files are played during a particular listening session, users can switch to Offline Mode. On a mobile device, launch the Spotify app, tap the gear icon, go to ‘Playback,’ then enable the ‘Offline’ switch. On Spotify Desktop, click the ‘Spotify’ menu (on a Mac) at the top of the screen then pick ‘Offline Mode.’ On Windows, hit the three-dot icon at the top of the screen, go to ‘File,’ then select ‘Offline Mode.’ Once the Spotify user does this, anything that hasn’t been downloaded will be grayed out and will be unplayable, until Offline Mode is turned off.

For the purpose of file upkeep and device storage maintenance, it’s good practice to remove Spotify downloads that have already been played all the way through. To do this, navigate to the downloaded album, playlist, or podcast episode through ‘Your Library.’ On the mobile app, you can also hit the ‘Downloaded’ filter to isolate all offline files. Next, hit the green downward arrow icon (green check icon for podcast episodes on Spotify Desktop) next to the item to delete, and hit ‘Remove’ if asked to confirm. Spotify mobile app users have an additional option to remove all downloads from their device by tapping the gear icon on the main screen, going to ‘Storage,’ and selecting ‘Remove all downloads.’

Read More Comments

Snap announces $50,000 Sounds Creator Fund in India

Snap announces $50,000 Sounds Creator Fund in India

Today, Snap has announced Snapchat Sounds Creator Fund, a new grant initiative meant to celebrate young, independent artists in India for their important role in propelling video productions, sparking internet trends, and defining cultural moments on Snapchat and Spotlight. Recently, Snapchat+ added story expiration controls and more.

Users in India enrich their Snaps with music and are able to communicate in a fun way thanks to the Sounds service, which allows users to add licenced music to their Snaps as well as their own creations. This feature has seen widespread adoption in India.

Since the debut of Snapchat Sounds, more than 2.7 billion videos have been generated on Snapchat with music from Snapchat Sounds, and these videos have been viewed more than 183 billion times throughout the world.


Creators of sounds who are selected to earn a grant from the Snapchat Sounds Creator Fund will, over the course of the next few months, be eligible to enjoy the following privileges from Snap:

Funding: Snap has teamed with DistroKid to handle and distribute $2500 payments to up to 20 artists every month. Snap expects to award up to $50,000 in grants per month of the programme.
Creative Support: Snap’s Music Team is constantly on the lookout for new licenced music that will inspire creative expression within our Sounds products, depending on the song’s relevance to our audience. When a licenced song becomes popular and resonates with our audience, it may be placed in relevant playlists in our Sounds creative tool, a Snapchat Lens, or Spotlight.

Availability

Starting in November, Snap will provide monthly prizes of up to US$50,000 to the top Sounds Creators in India who distribute music on Snapchat through DistroKid.

Furthermore, artists must be based in India, be at least 16 years old, and have parental approval when appropriate – Check out the terms here.

Commenting on the launch in India, Lakshya Malu, Interim – Market Development Lead, Snap Inc.

Read More Comments